
Thursday, October 31, 2013
Tuesday, October 29, 2013
Gloomy Weather? [FREE indoor activities for your kids]
I don't know about you, but it has been downright cold and rainy here today. Therefore, my outdoor plans with my little one have been postponed. Luckily, I found some great activities to keep her occupied that I would like to share with you!
 Crayola has literally hundreds of completely FREE coloring pages to print out for your kids, and it even has a little fall-themed section! It gives you a great opportunity to bond and interact with the little ones while the weather is not-so-friendly.
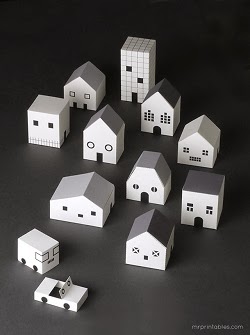
Also, check out these adorable 3D haunted houses from Mr. Printables!

Some other free activities I found:
Until next time,

Linking up to:


Also, check out these adorable 3D haunted houses from Mr. Printables!
Some other free activities I found:
- For little girls: A free Disney Princess printable activity kit from Target
- More Halloween-themed coloring activities from DLTK
- Some kid-friendly free online games on The Kidz Page (probably better for age 4-7)
Until next time,
Linking up to:
Sunday, October 27, 2013
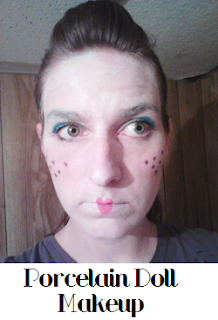
Last Minute Halloween Costume: Porcelain Doll Makeup Tutorial
Halloween is almost here! If you're like me, you wait until the week before Halloween to figure out what your costume is going to be. I usually do something that matches what my daughter is wearing, and this year we decided she is going to be a porcelain doll. I thought that was cool and original, and a little personal because my mom has collected antique dolls for as long as I can remember.
For those of you (ladies) who still have no idea what you are going to do for a costume (or you just got invited to a costume party at the last minute), the porcelain doll is both easy and relatively cheap. With about $5 worth of face paint, a dress out of your closet, stockings, and heels, you have a simple and unique last-minute costume.

 I picked up the cream makeup and the face paint crayons for $1.50 each. I already had the makeup brush and makeup sponges. If you don't want to use the crayon face paint (or can't find it), an ordinary face paint kit will work, and you may want to add a smaller makeup brush for details (like the freckles). I also used my own ordinary black mascara, but if you want a more dramatic look and have the extra cash, false lashes would be a plus.
[Note: Make sure you read the warnings on the makeup packaging. For instance, the makeup crayons pictured above advise that you don't use the red or orange on or around the eyes, or the blue on or around the mouth. Safety first!]
Step One: Apply a thin layer of the white makeup all over the face and neck using a makeup sponge. Blend so it looks even.


Step Three: Mix a small amount of the white makeup and red makeup directly on the makeup sponge and apply along the cheekbones. Blend. Using a brown or black, draw a few scattered dots on the apples of the cheeks for the freckles. If you are using the makeup crayons, you may want to sharpen it first (you can tell I didn't, because the freckles are huge).


Step Five: Using the red, draw a heart shape on the middle of your lips, using your natural lipline as a guide. I don't have much of a heart shape to my lips, so I extended it out a bit at the top. Fill in with a lip brush or your fingertip (this will help it last longer).
 [very cute and doll like, no?]
Finish the look with a thin layer of translucent powder, so all your hard work stays put and Voila!
Do you have any other great last-minute costume ideas? Share them in the comments!
Until next time,
For those of you (ladies) who still have no idea what you are going to do for a costume (or you just got invited to a costume party at the last minute), the porcelain doll is both easy and relatively cheap. With about $5 worth of face paint, a dress out of your closet, stockings, and heels, you have a simple and unique last-minute costume.

[Bad lighting, I know]

Here's a run-down of how I accomplished this look (simple and cute, no?)

[Note: Make sure you read the warnings on the makeup packaging. For instance, the makeup crayons pictured above advise that you don't use the red or orange on or around the eyes, or the blue on or around the mouth. Safety first!]
Step One: Apply a thin layer of the white makeup all over the face and neck using a makeup sponge. Blend so it looks even.
[Do I look a little ghostly?]
Step Two: If your eyebrows are thick like mine, you will probably need to use a brow brush and go over them again with the white makeup. I also used the brush to fill in the lips (you want them as white as possible when you go on to step five).
Step Three: Mix a small amount of the white makeup and red makeup directly on the makeup sponge and apply along the cheekbones. Blend. Using a brown or black, draw a few scattered dots on the apples of the cheeks for the freckles. If you are using the makeup crayons, you may want to sharpen it first (you can tell I didn't, because the freckles are huge).

[I kinda like it, It's got a little bit of a cartoony vibe]
Step Four: Using the blue, line the entire top eyelid, and extend the outline slightly above the crease on the outer edges (as shown below). Fill in completely. Apply your false lashes and/or mascara, and eyeliner if desired.
Step Five: Using the red, draw a heart shape on the middle of your lips, using your natural lipline as a guide. I don't have much of a heart shape to my lips, so I extended it out a bit at the top. Fill in with a lip brush or your fingertip (this will help it last longer).
Finish the look with a thin layer of translucent powder, so all your hard work stays put and Voila!
Do you have any other great last-minute costume ideas? Share them in the comments!
Until next time,
Linking up to:
Saturday, October 26, 2013
Fall is in the Air!
Hello to all of my new followers!
I'm pretty sure I've said it before, but I will say it again: I LOVE FALL! It's finally starting to get a little chilly outside, which is definitely making me want to curl up with a good book and relax till spring comes again. But, I also find that fall is a great time to focus on a lot of indoor activities (especially since this winter is supposed to be pretty harsh for us here in the Midwest). That being said, here in the next few weeks I will be focusing a lot more on my decorating and craft projects, so expect a lot more in the way of tutorials, and as it gets closer to Thanksgiving, I will definitely be flooding my page with all of the new recipes and ideas I find!
I hope you all stick around with me and see what's new in the coming weeks!
Until next time,
Thursday, October 24, 2013
Another Wedding Crash Course: Dresses
One of the most daunting tasks related to wedding planning is finding the perfect dress. Your wedding dress is the one outfit that you will be most-photographed in (and all in one day!), so what do you do when you have no idea what type or style of dress you want? Where to begin?
Well, I'm going to share some tips from the experts, as well as give a little run-down of the different options available, as well as tips to save money and stay stress-free! So, hopefully instead of being a dreaded outing, you can relax and have as much fun as possible finding the dress that is uniquely you.
If you are like me and know next-to-nothing about planning a wedding, I recommend you read (and bookmark!) the Simple Wedding Checklist on about.com. According to that list, you don't even need to think about your dress until approximately 8 months before your wedding date. By then, you will have a good grasp of what your theme, colors, and general atmosphere of your ceremony will be. This knowledge is essential to narrowing down your choice of dress. The location of the wedding will also determine factors such as train length, fabric, etc. I find it useful to have a general idea of the styles of dresses you are interested in before you hit the stores. Pinterest, the web, and bridal magazines are a great place to start. Clip and/or print pictures to put in your wedding book, and even take them with you to show your dress consultant so he/she can help you find the perfect dress.
That being said, I'm going to share a list of do's and don'ts for dress shopping from blogger Raquel Kelly via The Huffington Post.

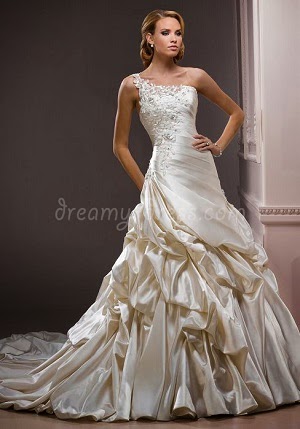
A more modern and cost-effective method of dress shopping is to do it primarily online. There are many discount dress websites that can get you a great dress on a tight budget, and they make the dress to order and fit it to your custom measurements. The only problem with this, is if the dress is not exactly what you expected when it arrives, you may have to go through a lengthy process to change/return/re-order, so if you choose to go this route, you may want to allow extra time just in case!
Below is a short list of some of the top discount dress websites:
Now, there are entire blogs dedicated to the subject of wedding dresses, and I'm going through the process for the first time myself, so if anyone has any other tips or advice for me (and the other readers), please feel free to leave them in the comment section!
Until next time,

Well, I'm going to share some tips from the experts, as well as give a little run-down of the different options available, as well as tips to save money and stay stress-free! So, hopefully instead of being a dreaded outing, you can relax and have as much fun as possible finding the dress that is uniquely you.
If you are like me and know next-to-nothing about planning a wedding, I recommend you read (and bookmark!) the Simple Wedding Checklist on about.com. According to that list, you don't even need to think about your dress until approximately 8 months before your wedding date. By then, you will have a good grasp of what your theme, colors, and general atmosphere of your ceremony will be. This knowledge is essential to narrowing down your choice of dress. The location of the wedding will also determine factors such as train length, fabric, etc. I find it useful to have a general idea of the styles of dresses you are interested in before you hit the stores. Pinterest, the web, and bridal magazines are a great place to start. Clip and/or print pictures to put in your wedding book, and even take them with you to show your dress consultant so he/she can help you find the perfect dress.
That being said, I'm going to share a list of do's and don'ts for dress shopping from blogger Raquel Kelly via The Huffington Post.
- DO take your time. If you are rushed, you may not make the best decision. And you will definitely save money if you take the time to shop around for the best price.
- DON'T just stand there! When trying on dresses, make sure you move around, sit, walk, even dance! You will be spending quite a bit of time in it, so make sure it's comfortable.
- DON'T bring your entire entourage. At least not the first go-around. When you have too many opinions bouncing around the room all at once, your own creative vision may get lost. Bring one or two close women (for example, your mother and your maid of honor) to the first shopping trip. Once you have your selection narrowed down to a few dresses, that would be the time to include the rest of the entourage (and DON'T forget to get your fiancé's opinion too!).
[source]
A more modern and cost-effective method of dress shopping is to do it primarily online. There are many discount dress websites that can get you a great dress on a tight budget, and they make the dress to order and fit it to your custom measurements. The only problem with this, is if the dress is not exactly what you expected when it arrives, you may have to go through a lengthy process to change/return/re-order, so if you choose to go this route, you may want to allow extra time just in case!
Below is a short list of some of the top discount dress websites:
- www.dreamy-dress.com
- www.lynnbridal.com
- www.weddingdressbee.com
- www.light-in-the-box.com/weddingdress
Now, there are entire blogs dedicated to the subject of wedding dresses, and I'm going through the process for the first time myself, so if anyone has any other tips or advice for me (and the other readers), please feel free to leave them in the comment section!
Until next time,
Sunday, October 20, 2013
My Top 5 Favorite Halloween Pins - 2013
Halloween is fast approaching! I can't lie- fall is my absolute FAVORITE season, and Halloween especially gives me a great reason to break out the craft supplies and deck out the house from top to bottom. We all know how much I love Pinterest, so as I've been searching for my latest fall inspiration, I thought I would share my top 5 Halloween-themed pins with you!
Let's start with my absolute favorite pumpkin-related DIY:

Now, my favorite DIY kid costume:

While we are on the subject of costumes, here's my favorite DIY adult costume:

Out of ALL of the numerous wreath tutorials on Pinterest, this one definitely takes the cake for me:
 And last but not least:

Let's start with my absolute favorite pumpkin-related DIY:
[source]
Cover pumpkins with patterned nylons- gives a classy, unique look without carving! And they last longer when not carved- extra plus!
Now, my favorite DIY kid costume:
Cotton candy! Just a simple t-shirt, poster board (to make the cone), pillow fill, spray paint, and elastic. Low cost, versatile (could be done in any color - for a boy or girl), and super easy! Need a last minute costume idea? Here ya go!
While we are on the subject of costumes, here's my favorite DIY adult costume:
[source]
Voodoo doll - once again, very versatile, and creepy without being over-the-top. Looks simple enough, dowels, foam balls, an old shirt, a felt heart, and a wig. Would definitely get people talking at a Halloween party!
Out of ALL of the numerous wreath tutorials on Pinterest, this one definitely takes the cake for me:
[source]
Love the skull, the tulle, the colors...everything! It's creepy and cute without being over-the-top. (Who says you have to do everything orange and black?) Not to mention, The36thAvenue happens to be one of my favorite blogs of all time. I think she was one of the first people I started following on Pinterest.
[source]
Cutest way to makeover your porch/outdoor space this fall: attach some of these DIY spooky eyes to your existing outdoor bench.
Now that I've gone over all of my boards with a fine-toothed comb to bring you this post, I'd better get going and start putting some of these ideas into motion. I hope you do the same!
Happy Halloween!!
Until next time,
Jess
My Beautiful Midwest Life
Linking up to:
Linking up to:
Wednesday, October 16, 2013
Dreaming of a DIY Wedding - Part 2
[If you haven't seen Part 1 of this post, you can find it by clicking here]
As I stated in the last post, there is an endless realm of possibilities for a DIY wedding. Making some (or all) of the elements of your big day by hand can add the ultimate personal touch and ensure that you have the unique, memorable day that you've always dreamed of. Here, I will go into more detail about some of the ways that you can stretch your dollar by doing-it-yourself.
Invitations: If you have a good printer, fancy paper, and some design experience, designing and printing your own invitations can save you hundreds of dollars. This is one way I am really saving on my wedding, and it also gives me the peace of mind knowing that no one else's invitations look the same as mine. (I will show you how they turn out in a later post.)
Catering: If you are having a smaller, more intimate ceremony/reception, think about serving your guests a nice, home cooked meal (cooked by your mother or your groom's mother) rather than having the extra expense of hiring a catering company. Some couples even opt for having a potluck reception - definitely less traditional, but it's also a way to get your guests more involved in your big day (not to mention a money-saver)!

[source]
Favors: Giving your guests something homemade as a wedding favor oftentimes has a lot more meaning. It really lets your guests know that you appreciate their love and support, rather than just giving them a store-bought trinket solely for tradition's sake.
Hair and Makeup: With all of the different online tutorials available out there, you can achieve the look you are going for without having the added expense of going to a professional. My look for my wedding is going to be pretty natural and laid-back (I don't really wear makeup on a day-to-day basis), so it doesn't make much sense to me to shell out hundreds of dollars for a one-day-only makeover when I can spend that piece of my budget elsewhere.
With all that being said, don't try to do EVERYTHING yourself - you will drive yourself crazy! Delegate, delegate, delegate. That's what your wedding party is for - the more people you have willing to help, the more projects you will be able to take on leading up to the big day. Here are a few do's and don'ts:
- If you have friends or relatives that specialize in a particular area, see if they will offer their services in lieu of a wedding gift (it could turn out to be priceless).
- Ask for advice- but take it with a grain of salt. Sometimes, your married friends and family can refer you to good quality vendors and help you get the best deal possible, but sometimes they can be too pushy/overbearing and that is definitely not good for your stress level.
- Shop local. Small businesses are more likely to give you more personal service and a much better deal. I'm going with a local florist in my area for all of my wedding flowers- they give the best advice and the best price, and they can tell you what will be in season during the time of your wedding to save you money.
- You will probably still have to hire vendors for a couple things (like a photographer - one thing that is definitely worth the investment) - so shop around!
Remember, the point is to have a nearly stress-free planning process, stay within your budget, and when the big day comes.... ENJOY IT!
Until next time,
Jess
My Beautiful Midwest Life
Dreaming of a DIY Wedding - Part 1
In this tough economy, the DIY (Do-it-yourself) movement is gaining a lot of momentum. This even applies to weddings! And if you're on a tight budget, like I am, doing a lot of things yourself (rather than having to hire a professional) can save you A LOT on your bottom line, and you will still end up with the dream wedding you always imagined. Lucky for us, there is a wide variety of info and inspiration available on the internet. To give myself a jumpstart on envisioning my dream DIY wedding, I checked out good ol' Pinterest.
If you don't use Pinterest, you can also do a Google Image search, but oftentimes Pinterest can lead you not only to the images, but to the how-to on those DIY projects. Here's just a sample of some DIY wedding decorations :

Pretty paper wrapped around tin cans = fun and affordable centerpieces. Add some wildflowers to add to the look. This picture was actually taken from a baby shower, but this would also look cute wrapped in your wedding colors for a rustic or outdoor wedding.
[source]

Mason jar tealight holders - could be used in many ways as cheap and pretty décor. I'm definitely using something like this for my country/rustic themed wedding, but it really can add to the romantic atmosphere of any wedding, no matter the setting or theme. They are versatile and cost next to nothing- what more could you ask for?
[source]

Rope wrapped around a dollar store vase with flowers - an easy DIY and versatile. You could incorporate this for a beach theme, country/rustic, or pretty much any kind of outdoor reception. This was one of the first things I pinned when thinking about my own wedding reception.
[source]

Cute and simple - will definitely fit well into my country/rustic theme when painted in my wedding colors. Much better than solo cups!
[source unknown]

Wine glass centerpieces - simple yet very classy. I've seen several versions of this, it is very simple and easily adaptable - can change out the candles, flowers, or glassware for endless combinations, and it will definitely be a conversation-starter for your guests.
[source]
Until next time,
Jess
My Beautiful Midwest Life
If you don't use Pinterest, you can also do a Google Image search, but oftentimes Pinterest can lead you not only to the images, but to the how-to on those DIY projects. Here's just a sample of some DIY wedding decorations :

Pretty paper wrapped around tin cans = fun and affordable centerpieces. Add some wildflowers to add to the look. This picture was actually taken from a baby shower, but this would also look cute wrapped in your wedding colors for a rustic or outdoor wedding.
[source]
Mason jar tealight holders - could be used in many ways as cheap and pretty décor. I'm definitely using something like this for my country/rustic themed wedding, but it really can add to the romantic atmosphere of any wedding, no matter the setting or theme. They are versatile and cost next to nothing- what more could you ask for?
[source]
Rope wrapped around a dollar store vase with flowers - an easy DIY and versatile. You could incorporate this for a beach theme, country/rustic, or pretty much any kind of outdoor reception. This was one of the first things I pinned when thinking about my own wedding reception.
[source]
Cute and simple - will definitely fit well into my country/rustic theme when painted in my wedding colors. Much better than solo cups!
[source unknown]
Wine glass centerpieces - simple yet very classy. I've seen several versions of this, it is very simple and easily adaptable - can change out the candles, flowers, or glassware for endless combinations, and it will definitely be a conversation-starter for your guests.
[source]
There are SO many more ideas out there, it would be impossible to list them all, but I hope I got some creative wheels turning with that little sneak-preview. Part 2 of this post will detail more money-saving DIY tips that I have compiled in my wedding research, and some that I have discovered on my own through trial-and-error and based on the advice of friends.Until next time,
Jess
My Beautiful Midwest Life
Monday, October 14, 2013
My First Foray into Wedding Planning
Let me begin by saying I know next to nothing about weddings. I've only attended two weddings in my life, my parents' (when I was six) and my sister's, and I've never been in one. Apart from watching a handful of episodes of Say Yes to the Dress,I know next to nothing about the actual wedding planning process. So my first step was to hit the internet and get a rundown on the basics.
Step One. Set the date! Popular opinion suggests it takes about a year to plan a wedding, but I've read that it can be done in six months (or even less, eek!). Since I'm not in any hurry and to avoid any undue stress, I'm going to go with the generally accepted time frame of 13 months. Truth be told, I don't even have a ring yet! (My fiance knows ho w picky I am, so he's letting me pick it out myself. )
The reasoning behind setting the date first is because one comes to find it difficult to proceed with the other stages of planning if they haven't at least set a rough date. Venues must be found, vendors hired, invitations designed., all of which require the date.
In my case, I've set a rough date of November 12 2014, which is subject to change depending on the availability of my preferred venues and the mood of my groom.
Step Two. Budget, budget, budget. Most websites agree not to spend beyond your means, so setting a realistic budget is very important. It makes sense, since you don't want to add any additional stress to the planning process, and you also don't want to begin your wedded life together with a mountain of debt. Most websites also agree that the best thing to do is pick the three elements that are most important to you (in my case, that is the dress, the location, and the food) and realize that you will be spending the bulk of your money on those three categories.
I've also read that you can plan on spending nearly half of your budget on food and drinks. That is easy to believe since I calculated the cost of providing beer and wine to all 50 of my guests to be close to $600. (Not to mention the cost of the cake!)
theknot.com provides this tip: leave 5% of your total budget as a "buffer" to handle those unexpected expenses that inevitably pop up. I will definitely be following that advice!
Step Three. Now the fun part! I'be been scouring pinterest and the world wide web in search of ideas and inspiration to further hone my creative vision for the day. I've also began to look for my dress (some people wait until later to do this, but I've known what kind of wedding dress I want since I was 10 years old - I'm like a kid in a candy store!) My next post will outline some of the details of the ceremony and reception that I've already chosen, and for those of you who are not quite as dead-set on a dress style as I am, a later post will outline some dress shopping how-to's (as well as some money-saving shortcuts)!
Until next time,
Jess
My Beautiful Midwest Life
Tuesday, October 8, 2013
Welcome to My Beautiful Midwest Life!
Hi everyone! Since this is my first post, I think it is only fitting to let you all know why I'm writing this blog, and also tell you a little about myself.
My name is Jessica. I'm 24 years old and newly engaged. I have a beautiful 4 year old daughter and 22 month old future stepdaughter. I was born and raised in the Midwest and I absolutely LOVE it here! I consider myself to be a country girl through and through. I love being creative in every aspect of my life, so one of the purposes of this blog is to catalog some of my many craft projects. I love to cook, so i will also be posting some tips as well as some tried-and-true recipes.
However, my real motivation for starting tis blog is to document my journey of planning my wedding (which will hopefully be happening next fall). I know there is already alot of literature out there about wedding planning, but it's all quite overwhelming for someone like me. I'm a pretty average working mom. I don't have a million dollar budget or endless connections or a miles-long guest list. So my goal, ultimately, is to paint a more realistic interpretation of the daunting task of planning a wedding (on a normal working family's budget). I hope that whoever reads this blog will learn something.
This leads me to my secondary goal. I also wish to use this blog to share things that inspire me, in the hopes that they inspire others as well. I will be linking up to my Pinterest page (which, in my opinion, is the greatest social networking site ever invented) to share some of the many ideas that are constantly bouncing around in my head. I plan on sharing my trials and tribulations, failures and successes, so that others may learn what works and what doesn't. I will also be sharing ideas I've come across from other blogs, because I absolutely love it when creative people from all over the world can get together on the internet and bounce ideas off of each other.
Which leads me to where you, the reader, fits in to this equation. This blog cannot possibly be a success if no one is there to read it. I know most blog writers ask readers for feedback. I will be doing the same. But what makes me different is that I thrive on reader feedback. I assure you it's not because I'm an attention whore (quite the opposite, actually), but because I actually enjoy hearing other people's opinions, both positive and negative. I hope you will take some time to share yours with me. let's get a conversation going!
Until next time,
Jess
My Beautiful Midwest Life
Subscribe to:
Posts (Atom)