
Showing posts with label Halloween. Show all posts
Showing posts with label Halloween. Show all posts
Thursday, October 31, 2013
Sunday, October 27, 2013
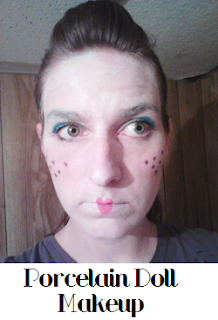
Last Minute Halloween Costume: Porcelain Doll Makeup Tutorial
Halloween is almost here! If you're like me, you wait until the week before Halloween to figure out what your costume is going to be. I usually do something that matches what my daughter is wearing, and this year we decided she is going to be a porcelain doll. I thought that was cool and original, and a little personal because my mom has collected antique dolls for as long as I can remember.
For those of you (ladies) who still have no idea what you are going to do for a costume (or you just got invited to a costume party at the last minute), the porcelain doll is both easy and relatively cheap. With about $5 worth of face paint, a dress out of your closet, stockings, and heels, you have a simple and unique last-minute costume.

 I picked up the cream makeup and the face paint crayons for $1.50 each. I already had the makeup brush and makeup sponges. If you don't want to use the crayon face paint (or can't find it), an ordinary face paint kit will work, and you may want to add a smaller makeup brush for details (like the freckles). I also used my own ordinary black mascara, but if you want a more dramatic look and have the extra cash, false lashes would be a plus.
[Note: Make sure you read the warnings on the makeup packaging. For instance, the makeup crayons pictured above advise that you don't use the red or orange on or around the eyes, or the blue on or around the mouth. Safety first!]
Step One: Apply a thin layer of the white makeup all over the face and neck using a makeup sponge. Blend so it looks even.

Step Three: Mix a small amount of the white makeup and red makeup directly on the makeup sponge and apply along the cheekbones. Blend. Using a brown or black, draw a few scattered dots on the apples of the cheeks for the freckles. If you are using the makeup crayons, you may want to sharpen it first (you can tell I didn't, because the freckles are huge).


Step Five: Using the red, draw a heart shape on the middle of your lips, using your natural lipline as a guide. I don't have much of a heart shape to my lips, so I extended it out a bit at the top. Fill in with a lip brush or your fingertip (this will help it last longer).
 [very cute and doll like, no?]
Finish the look with a thin layer of translucent powder, so all your hard work stays put and Voila!
Do you have any other great last-minute costume ideas? Share them in the comments!
Until next time,


For those of you (ladies) who still have no idea what you are going to do for a costume (or you just got invited to a costume party at the last minute), the porcelain doll is both easy and relatively cheap. With about $5 worth of face paint, a dress out of your closet, stockings, and heels, you have a simple and unique last-minute costume.

[Bad lighting, I know]

Here's a run-down of how I accomplished this look (simple and cute, no?)

[Note: Make sure you read the warnings on the makeup packaging. For instance, the makeup crayons pictured above advise that you don't use the red or orange on or around the eyes, or the blue on or around the mouth. Safety first!]
Step One: Apply a thin layer of the white makeup all over the face and neck using a makeup sponge. Blend so it looks even.
[Do I look a little ghostly?]
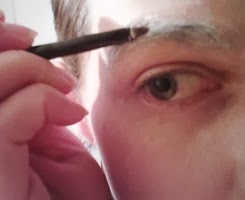
Step Two: If your eyebrows are thick like mine, you will probably need to use a brow brush and go over them again with the white makeup. I also used the brush to fill in the lips (you want them as white as possible when you go on to step five).
Step Three: Mix a small amount of the white makeup and red makeup directly on the makeup sponge and apply along the cheekbones. Blend. Using a brown or black, draw a few scattered dots on the apples of the cheeks for the freckles. If you are using the makeup crayons, you may want to sharpen it first (you can tell I didn't, because the freckles are huge).

[I kinda like it, It's got a little bit of a cartoony vibe]
Step Four: Using the blue, line the entire top eyelid, and extend the outline slightly above the crease on the outer edges (as shown below). Fill in completely. Apply your false lashes and/or mascara, and eyeliner if desired.
Step Five: Using the red, draw a heart shape on the middle of your lips, using your natural lipline as a guide. I don't have much of a heart shape to my lips, so I extended it out a bit at the top. Fill in with a lip brush or your fingertip (this will help it last longer).
Finish the look with a thin layer of translucent powder, so all your hard work stays put and Voila!
Do you have any other great last-minute costume ideas? Share them in the comments!
Until next time,
Linking up to:
Sunday, October 20, 2013
My Top 5 Favorite Halloween Pins - 2013
Halloween is fast approaching! I can't lie- fall is my absolute FAVORITE season, and Halloween especially gives me a great reason to break out the craft supplies and deck out the house from top to bottom. We all know how much I love Pinterest, so as I've been searching for my latest fall inspiration, I thought I would share my top 5 Halloween-themed pins with you!
Let's start with my absolute favorite pumpkin-related DIY:

Now, my favorite DIY kid costume:

While we are on the subject of costumes, here's my favorite DIY adult costume:

Out of ALL of the numerous wreath tutorials on Pinterest, this one definitely takes the cake for me:
 And last but not least:


Let's start with my absolute favorite pumpkin-related DIY:
[source]
Cover pumpkins with patterned nylons- gives a classy, unique look without carving! And they last longer when not carved- extra plus!
Now, my favorite DIY kid costume:
Cotton candy! Just a simple t-shirt, poster board (to make the cone), pillow fill, spray paint, and elastic. Low cost, versatile (could be done in any color - for a boy or girl), and super easy! Need a last minute costume idea? Here ya go!
While we are on the subject of costumes, here's my favorite DIY adult costume:
[source]
Voodoo doll - once again, very versatile, and creepy without being over-the-top. Looks simple enough, dowels, foam balls, an old shirt, a felt heart, and a wig. Would definitely get people talking at a Halloween party!
Out of ALL of the numerous wreath tutorials on Pinterest, this one definitely takes the cake for me:
[source]
Love the skull, the tulle, the colors...everything! It's creepy and cute without being over-the-top. (Who says you have to do everything orange and black?) Not to mention, The36thAvenue happens to be one of my favorite blogs of all time. I think she was one of the first people I started following on Pinterest.
[source]
Cutest way to makeover your porch/outdoor space this fall: attach some of these DIY spooky eyes to your existing outdoor bench.
Now that I've gone over all of my boards with a fine-toothed comb to bring you this post, I'd better get going and start putting some of these ideas into motion. I hope you do the same!
Happy Halloween!!
Until next time,
Jess
My Beautiful Midwest Life
Linking up to:
Linking up to:
Subscribe to:
Posts (Atom)